All in One View
Content from Ethical and Multilingual Description Standards
Last updated on 2026-03-10 | Edit this page
Overview
Questions
- Who is your intended audience?
- What are their needs?
Objectives
- Describe your data’s intended audience and their needs.
- Appraise the strengths of different existing standards.
- Understand basic descriptive metadata ethics.
In this episode, we will evaluate different methods to clean up and enhance your data, all the while keeping in mind an ethical obligation to provide inclusive access to information. We’ll then apply these techniques to our sample data set.
Knowing your audience is the first step to ensure that you have adequate data categories. In our spreadsheet, we started with typical access points such as title, creator (institutional host), resource type, subject, language, and URL. Then we thought of our target audience: What access points would students, faculty, or other librarians want to search by?
With this question in mind, we added metadata on Country Coverage and Time Period.
Matching Metadata Standards to a Target Audience
Imagine one target audience includes students, teachers, and librarians in Latin America. What kind of metadata might enhance access to your data, with emphasis on their particular needs? (Choose all that apply)
- Terms in Spanish & Portuguese
- Country Coverage
- Resource type
Answer: A & B. While A, B, and C are all useful metadata, adding additional columns for subject access in Spanish and Portuguese provides a broader audience the ability to keyword search in the two most widely used languages in Latin America. The ability to narrow by specific countries, rather than a broader Latin America or by continent, gives users more precise searching capabilities.
Resource type is essential metadata for any research project, but does not relate to resources about Latin America.
Don’t start from scratch!
Find a cheat sheet for cleaning up spreadsheets, such as:
Marina Georgieva’s Data Remediation at Scale: How to Clean Up Your Metadata Quickly and Effectively Using Excel
Existing Tutorials for General Spreadsheet Cleanup
There are free tutorials and other tools to help you clean your data quickly. For example, Google Sheets has a built-in Smart Cleanup tool. You can find it under Data–Data Cleanup–Cleanup Suggestions.
For more info, see Google’s Sheets Smart Cleanup to prepare your data for analysis
Appraise the Strengths of Different Standards
Metadata standards already exist for all kinds of data. If you can find one that matches some of your needs, you will save yourself a lot of time. One area that we recommend outsourcing when possible is the use of controlled vocabularies. Instead of coming up with your own list of terms to use consistently (and thus enhance collocation of results), see if one exists.
Appraising Controlled Vocabularies
The sample spreadsheet is part of our larger project featuring free online resources relating to Latin American, Caribbean, Latinx and Iberian Studies. Which of the following controlled vocabularies best fits our data?
- Library of Congress Subject Headings (LCSH)
- Hispanic American Periodicals Index (HAPI) Subject Headings
- Medical Subject Headings (MeSH)
Answer: B. HAPI Subject Headings align neatly with our defined area. While based in part on LCSH, HAPI is more focused vocabulary and also has the flexibility to update their terminology without the long proposal process at the Library of Congress. Updating the names of indigenous tribes, for example, is a multi-year project for LC while HAPI can update those names more quickly.
Don’t want to create your own controlled vocabulary?
Find an existing one! Search for one related to your scholarly area or try Patricia Harpring’s Introduction to Controlled Vocabularies: Terminologies for Art, Architecture, and Other Cultural Works
Basic Descriptive Metadata Ethics
When choosing which metadata to capture, how to organize it, and how to use it, we necessarily apply our own perspectives and experiences to those choices. Thus it is important to conscientiously work to avoid bias as much as possible. Take a step back and think about how the structure of your metadata may help or hinder access by your target audience.
For more guidance, see: + The Cataloging Code of Ethics + Statement of Internaitonal Cataloging Principles
Evaluate Sample Dataset
At this point, go ahead and copy the lacli-sample-data spreadsheet to your Google Drive. We’ll explore the data through the following two questions.
There are typos that may result in inaccurate search results. How might you edit this?
Use tutorials and other existing Google Sheet shortcuts. Filtering within a column, for example, is a fast way to pull out terms only used once, some of which may in fact be typos.
There is a problematic or outdated term for a group of people in your subject columns. How might you quickly fix a term quickly for the whole column?
Use Find & Replace
Focusing on the needs of your intended audience will guide you to choose the best standards and focus areas to clean up your metadata. This ultimately leads to a more user-friendly and ethical system.
Content from Building the Search Web App
Last updated on 2025-07-21 | Edit this page
Overview
Questions
- Based on my data, what are the functional requirements for a simple search and discovery web app?
- What is an API endpoint?
- How can I use the JavaScript methods .get(), .filter(), and .map() to retrieve my data, filter my data, and display my data on the web app.
Objectives
- Establish functional requirements for a web application.
- Transform a Google Sheet into a simple API endpoint with Google App Script.
- Build three JavaScript functions that filter and display your Google Sheet data on a website.
Background
In this episode, we will create a single page website that displays data from a Google Sheet and lets users search through this data, all using JavaScript. We’ll begin by establishing functional requirements for your project. Functional requirements specify what the system should do, and from there you can select what technology will best help you meet those requirements.
Next, we’ll transform our Google Sheet into a database, converting it to an API endpoint. You’ll learn about APIs and how they transfer data from your spreadsheet to your website.
We’ll then connect our website and database. We’ll write some JavaScript to fetch data from the spreadsheet and then display that data to the user.
Finally, we’ll build the the search interface. This will include data normalization, which ensures that small variations in users’ searches do not result in wildly different results (e.g., variations in capitalization, accents, and special characters).
- Copy our LACLI Sample Data spreadsheet to a new folder in your Google Drive. You can name this folder whatever you like.
- Download these starting code files: webapp.zip
Functional Requirements
In any technical project, it’s essential to establish clear functional requirements before diving into the technical details. Establishing these requirements from the start ensures that the team stays focused on the project’s goals, rather than getting sidetracked by fancy features or bells and whistles.
During the development of the LACLI project, we arrived at a series of functional requirements. Many of which are shared by digital projects in the humanities and social sciences:
| Functional Requirement | Solution |
|---|---|
| A free, intuitive, and collaborative database solution that can be easily edited by multiple volunteers without prior database knowledge. | Google Sheets is a free, cloud-based spreadsheet solution that is intuitive to use, supports real-time collaboration by multiple users, and does not require extensive database knowledge. |
| Free web hosting services to store and access website files. | GitHub Pages allows you to easily publish static websites directly from your GitHub repositories and use custom URL. |
| The client-side technology should be open-source and avoid the use of front-end frameworks, which have a steep learning curve and can dissuade collaboration among those unfamiliar with a given framework. | JavaScript is the core programming language of the web and is open-source. It provides for collaboration and easy maintenance as it is framework independent. |
| The user interface should allow users to search through the data using keywords and present resources in an attractive, easy-to-read format that includes links to the original resources. | JavaScript can make API calls, filter data, and display data on a webpage by injecting HTML into the site at run time. |
| The website must be translatable. | JavaScript can create a translation table inside of an object to switch the site’s text content. |
With this solution, the LACLI team can intutively edit data using Google Sheets. The added benefit is that Google already has an entire security infrastructure: you can set permissions of who can view, comment, or edit files in Google Drive. We use JavaScript to get the data from the spreadsheet to our website. The JavaScript file that does that data manipulation, as well as the HTML and CSS files that give structure and style to our site, all live in a GitHub repository and are served to the public via their GitHub Pages service.
Write Your Own
Based on the functional requirement assessment above, create your own two column table and list the functional requirements for your project on one side. As you progress through this lesson, note what suggestions provided here could be solutions to your specific functional requirements.
Google Sheet as API Endpoint
The first technological hurtle is the fact that a Google Sheet is not automatically set up like a database. We will do this in three steps: 1. Create a Google App Script file that uses the Google Sheets API. 2. Write a script in that file that wraps up all the data in our spreadsheet in JSON. 3. Launch our script as a web app, which creates a unique API endpoint for our data and will permit our website to get that data and bring it to the user’s browser.
An API is a set of protocols that delivers data to a website. We want our site to receive the data in our spreadsheet as JSON (JavaScript Object Notation), which is a text-based data format to transmit data objects between a web server and a client-side application.
When we talk about server-side, we are talking about operations that happen in the database on the servers. When we talk about client-side, we are talking about operations that occur in the user’s browser.
Activating the Google Sheet API and transforming our Spreadsheet into JSON data requires that we create a Google App Script file.
In a Google Drive folder, make a copy of our LACLI
Sample Data spreadsheet. In this same folder, we’ll create a Google
App Script file and name it Convert Sheet to JSON. This
video will show you how to create the file and add the Google Sheets API
under Services:
Now that the Sheets API is set up, we will instruct it to wrap up our spreadsheet data in JSON. First, in the text editing window of Google App Script, delete the default function:
We will replace it with the following code:
JAVASCRIPT
function doGet(request) {
  var spreadsheetId = '....'; // Replace with Google Sheet ID
  var sheetName = 'Main'; // Replace with the sheet you want to retrieve data from
  // make sure the advanced sheets service is enabled for this script
  var dataValues = Sheets.Spreadsheets.Values.get(spreadsheetId, sheetName).values;

  // Change the index from 0 to 2 to use row 3 as column headings
  var headers = dataValues[2];

  var rows = [];
  for (var i = 3; i < dataValues.length; i++) { // Start from row 4, as row 3 is the column headings
    var row = {};
    for (var j = 0; j < headers.length; j++) {
      row[headers[j]] = dataValues[i][j];
    }
    rows.push(row);
  }

  var output = JSON.stringify(rows);
  return ContentService.createTextOutput(output).setMimeType(ContentService.MimeType.JSON);
}
Let’s take this code step by step:
-
function doGet(request)is a stock function in Google App Script that handles a GET request made to your script’s web app URL. A GET request simply gets data from a specific location.
- Your spreadsheetid is available in the URL for the spreadsheet. Copy
the string of alphanumeric characters in the URL of your
spreadsheet:

-
var headers = dataValues[2], sets the index of where the JSON should read header names. Because in our spreadsheet we have 2 rows of contextual information at the top of the spreadheet, we want the JSON to start on row 3 to find column header names.
-
var rows = [],the script will loop over all rows to add them to the JSON.
The last step is launching the Apps Script web app:
Keep the URL handy!
At the end of the video, you see that a red box appears around the Apps Script web app URL. This URL will act as our API endpoint and enable our discovery system to import all the data from our Google Sheet in JSON. Save this URL. You can also copy this URL into your browser, hit return, and you’ll see all our spreadsheet data represented in JSON.
Get your Data: getData()
In this section we will take the API endpoint, which we created with Apps Script, and connect it to our website. We’ll then display that data on our website.
To begin, download the webapp startup code as a zip file: webapp.zip. This zip file contains the starting files for our website. The file structure will look like this:
–webapp
–app.js
–index.html
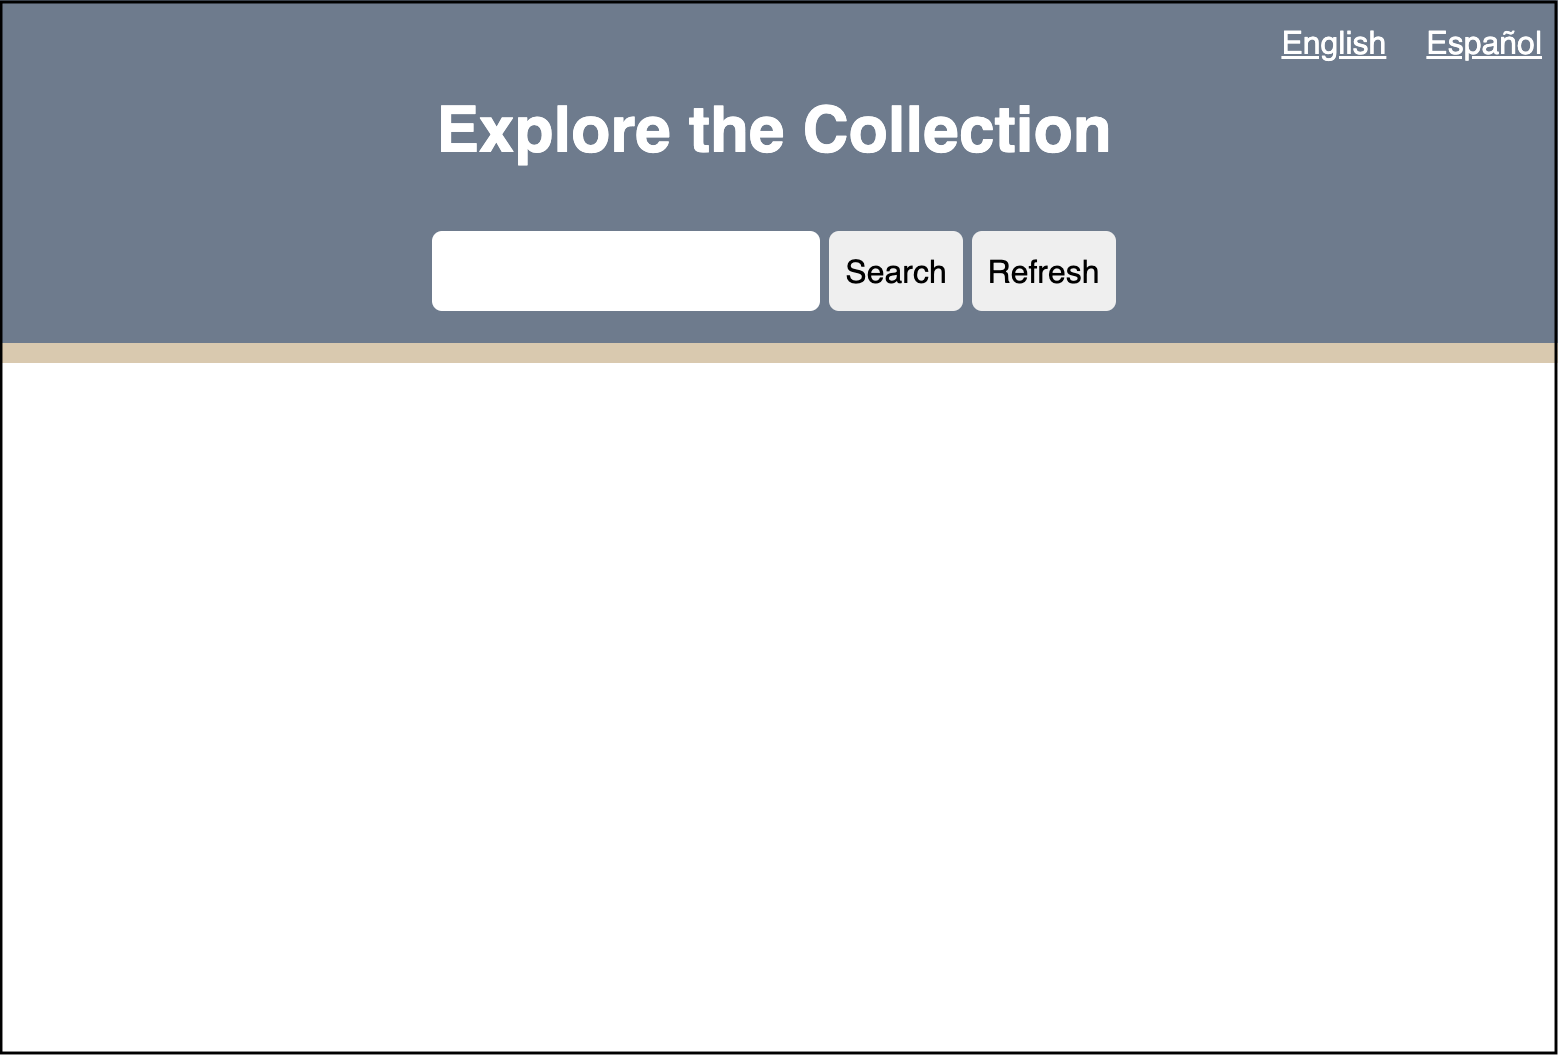
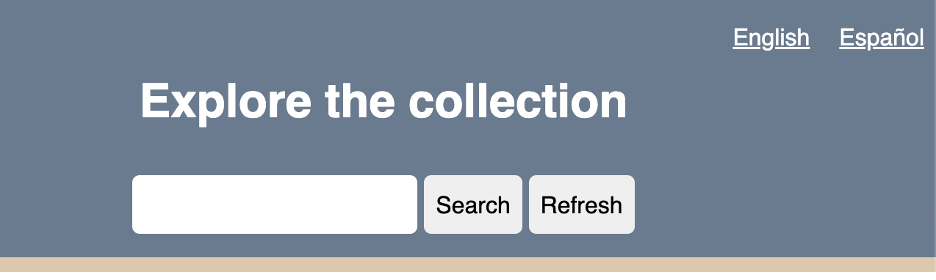
–style.cssOpen index.html in the browser and you will see a basic structure for our discovery system. I’ve already given you some basic styling. We won’t be looking at style.css during this lesson, but feel free to modify it later.
From top to bottom: we have our language selection buttons, which we will use in a later episode to translate our page. Then we have our search bar, search button, and refresh button. We will use these in the next episode to enable users to search through the research data by with keywords. Last, in the blank white space is where we will populate our website with our research data.
Now open the webapp folder in your preferred Integrated
development environment (IDE). Let’s take a look at app.js,
which will drive our site’s functionality. Right now, we only have a
road map of how we will build our system:
APP.JS
// Define API endpoint and DOM elements
const googleSheet = '';


// Get Data


// Filter Data


// Display Data
In app.js, we have a variable googleSheet.
Let’s set this to the URL of the Apps Script web app by copying the URL
between the single quotes.
Now we need to have app.js request that our Apps Script
web app send our site the JSON data. We will do this by creating our
first function, getData(). 1. Create an object called
apiData where we will store the incoming data.
- Create an async function that will make a fetch request to our Google Sheet.
APP.JS
// Get data
let apiData = [];


async function getData(url) {
   const response = await fetch(url);
   const data = await response.json();
   apiData = data;
}
The getData function will use an API endpoint (the URL
of our Apps Script web app) to fetch data and save it in a object called
response. Next, we will format the response as JSON in an
object called data. Lastly, we assign that formatted data
from the fetch request as our apiData object.
A unique attribute of JavaScript are promises. Promises are objects that represents the eventual completion (or failure) of an asynchronous operation. Promises typically do not happen as soon as a page loads, but take some time. In our case, we assign the async keyword before declaring the getData function because we know that the request for the Google Sheet data will take some time to reach our webpage. Similarly, the await keyword is used when we make the fetch request and format our fetch response in JSON because we are anticipating that the data will not arrive when the page loads.
- As a result of using promises, it is best practice to use the try/catch error handling block in our function in case there is some error retrieving the data. Our final getData() function should look like this:
APP.JS
// Get data
let apiData = [];


async function getData(url) {
 try {
   const response = await fetch(url);
   const data = await response.json();
   apiData = data;
 } catch (error) {
   window.alert(error.message);
 }
}- Lets test to make sure we are getting the data from our Google
Sheet. We can log our incoming data to the console. Right below line 7,
let’s add
console.log(apiData);Our fullapp.jsshould look like this:
APP.JS
// Define API endpoint and DOM elements
const googleSheet = 'https://script.google.com/macros/s/...';

// Get data
let apiData = [];

async function getData(url) {
 try {
   const response = await fetch(url);
   const data = await response.json();
   apiData = data;
   console.log(apiData); //Test if data fetch is working correctly
 } catch (error) {
   window.alert(error.message);
 }
};

getData(googleSheet);- We now need to link our
app.jsfile and ourindex.html. Open upindex.htmland just before the end body tag, link theapp.jsfile:
- Open
index.htmlin the browser (I suggest Chrome) and open developer tools. Then click on the console tab and you should see your data in an array:
Examine the JSON Object
Success! Lets look at this data to get a sense of what is going on. Let’s expand the first item in the array:
0:
  Assuntos_em_Portugues: "Povos indígenas; Ambientalismo"
  Countries: "Brasil"
  Institutional_Hosts: "Instituto Socioambiental "
  Languages: "Português"
  Materias_en_Espanol: "Pueblos indígenas; Ambientalismo"
  Resource_Title: "Acervo Digital sobre Povos Indígenas, Populações Tradicionais e Meio Ambiente"
  Resource_Types: "Audiovisual Materials; Books; Texts (Other); Visual Materials"
  Subjects_in_English: "Indigenous peoples; Environmentalism"
  Summary: "\"O ISA possui um vasto acervo relativo a povos indígenas, populações tradicionais e meio ambiente, formado desde 1974, compreendendo diversos tipos de materiais arquivísticos, audiovisuais, bibliográficos (artigos, livros, dissertações e teses), e notícias de jornais.  O acervo está indexado por etnias, categorias de população tradicional (caiçaras, quilombolas, seringueiros), unidades de conservação, terras indígenas, biomas, bacias, temas (biodiversidade, educação e saúde indígena, energia, estradas, etnografia, florestas, mudanças climáticas, recursos hídricos, recursos minerais, política socioambiental, entre outros), sub-temas e palavras-chave.\""
  Time_Coverage: "20th century; 21st century"
  URL: "https://acervo.socioambiental.org/"
JSON works in key-value format. This format will be the same for every entry in our data. All the keys are exactly the column headings in our Google Sheet. This is very useful because we can call specific pieces of metadata about a resource by using the column headings. The values, presented within quotes, are the data per row of our data. So, for example, if we want to display the title of a resource in our data table, we can ask JavaScript to show us the Resource_Title for a specific row.
Display your Data: displayData()
Now let’s move to displaying this data on the website in a
user-friendly format. In our index.html file, you will see
we have a <div> element with the id of “display”
within the <main> part of our document.
To display our data, we will target
<div id="display"> in our app.js file
and dynamically inject html containing our data here. To target this
<div>, we will get this element by its id in
app.js:
Now that it’s targeted, we can control the html injection with a new
function in app.js called displayData():
APP.JS
const display = document.getElementById('display');
// Display data
function displayData(data) {
let dataDisplay = data.map((object) => {
return `
<h2>${object.Resource_Title}</h2>
`;
}).join('');
display.innerHTML = dataDisplay;
};This function takes our data as input. It then creates an object
called dataDisplay where we will store our formatted data
for display to the user.
The key part of displayData() is the use of the
.map() method. In Javascript, .map() creates a
new array from an existing array by applying a provided function to each
element in the existing array. In our project, .map will
take our data array, a create a new array, dataDisplay,
that will take each object and format it in html, ready to be injected
into index.html, which occurs in the last line of the code
above, display.innerHTML = dataDisplay;
displayData() iterates over all of our data and places
each object’s “Resource_Title” within <h2> tags. The
map function makes it easy to specify where you’d like what piece of
data within the html by calling:
object.<insert column name from spreadsheet>. In the
case of the title of each resource, we are using
object.Resource_Title.
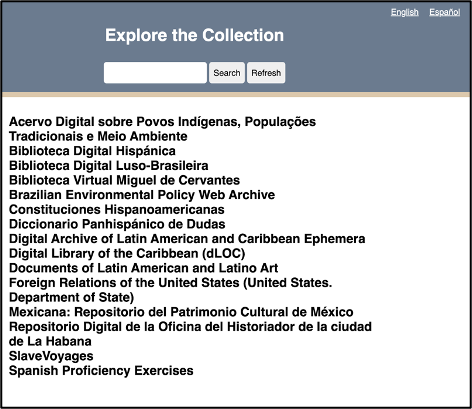
Open index.html in the browser and you will see the
“Resource_Title” of each object in our data array now populating the
formerly blank white space below the search bar.
In our lacli-sample-data spreadsheet, we have a lot of other data about each resource that is useful to users: - Resource_Types - Languages - Countries - URL - Subjects_in_English - Materias_en_Espanol - Assuntos_em_Portugues - Time_Coverage - Institutional_Hosts - Summary
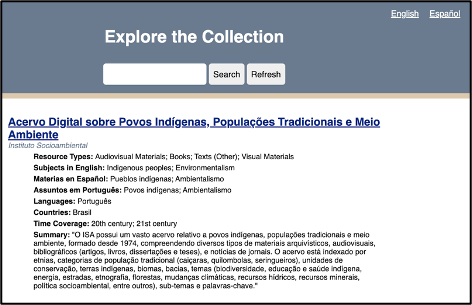
We will have to make some decisions about the hierarchy in which we display each resource’s data. And these decisions should make sense to the user when they are reading through our site. For example, the “Resource_Title” should serve as a “URL” link to the resource. Below the title, we should have the “Institutional_Hosts.” The rest of the data is there to describe the resource so that a user can quickly evaluate whether they are interested in a given resource. Here is one possible arrangement of this data in html:
HTML
<article class="item">
<div class="item-header">
<h2><a href="${object.URL}" target="_blank" rel="noopener noreferrer">${object.Resource_Title}</a></h2>
<p>${object.Institutional_Hosts}</p>
</div>
<div class="item-description">
<p><span class="inline-label">Resource Types: </span>${object.Resource_Types}</p>
<p><span class="inline-label">Subjects in English: </span>${object.Subjects_in_English}</p>
<p><span class="inline-label">Materias en Español: </span>${object.Materias_en_Espanol}</p>
<p><span class="inline-label">Assuntos em Português: </span>${object.Assuntos_em_Portugues}</p>
<p><span class="inline-label">Languages: </span>${object.Languages}</p>
<p><span class="inline-label">Countries: </span>${object.Countries}</p>
<p><span class="inline-label">Time Coverage: </span>${object.Time_Coverage}</p>
<p><span class="inline-label">Summary: </span>${object.Summary}</p>
</div>
</article>Here you can see that we can call each different data element per
resource with the same notation we used when applying Resource_title:
object.Resource_Title
Want to call the language of the resource?
object.Languages. Materias en Español?
object.Materias_en_Espanol. Again, all borrowing from the
column headings on our Google Sheet. We wrap each resource in an
<article> tag as it defines independent content and
thus improves accessibility by providing clear structure for assistive
technologies.
We can copy this html into our displayData() function like this:
APP.JS
const display = document.getElementById('display');
// Display data
function displayData(data) {
let dataDisplay = data.map((object) => {
return `
<article class="item">
<div class="item-header">
<h2><a href="${object.URL}" target="_blank" rel="noopener noreferrer">${object.Resource_Title}</a></h2>
<p>${object.Institutional_Hosts}</p>
</div>
<div class="item-description">
<p><span class="inline-label">Resource Types: </span>${object.Resource_Types}</p>
<p><span class="inline-label">Subjects in English: </span>${object.Subjects_in_English}</p>
<p><span class="inline-label">Materias en Español: </span>${object.Materias_en_Espanol}</p>
<p><span class="inline-label">Assuntos em Português: </span>${object.Assuntos_em_Portugues}</p>
<p><span class="inline-label">Languages: </span>${object.Languages}</p>
<p><span class="inline-label">Countries: </span>${object.Countries}</p>
<p><span class="inline-label">Time Coverage: </span>${object.Time_Coverage}</p>
<p><span class="inline-label">Summary: </span>${object.Summary}</p>
</div>
</article>
`;
}).join('');
display.innerHTML = dataDisplay;
};The CSS I’ve already provided will handle the formatting of our data, to aid in readability and reinforce our hierarchy of information.
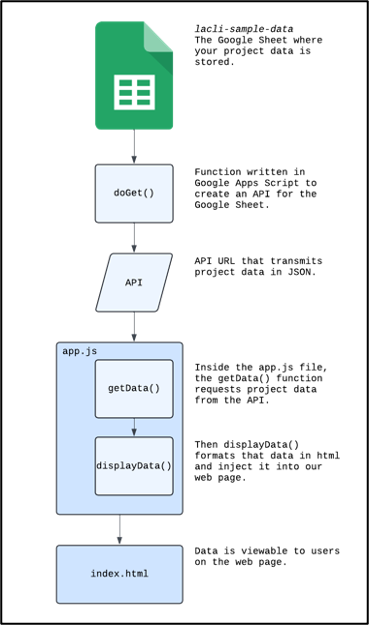
What we’ve accomplished so far
This flowchart recaps the key functions we’ve written that move the data from our spreadsheet to our website.
Filter your Data: filterData()
Up to this point, we’ve focused on connecting our site to our Google Sheet API and displaying that data in the browser. We haven’t touched the search functionality.
To call this functionality “searching” very much anthropomorphizes the code. Humans search using a variety of emotion, reason, and what we might call algorithms to sift through information to determine what is most relevant at a given time. What our will do is much simpler and a better way to describe it is filtering the data. We will filter the data according to whether the data we have describing a resource matches or does not match the user’s keywords. For example, if a user enters the keyword “periodicals,” we want to return all resources whose “Resource_Types” include “periodicals.”
Filtering the data will occur after the browser has received data
from the Google Sheet API, the getData() function, and
before that data is displayed on the website to the user, the
displayData() function.
It is very important to remember that after getData() is called, all of the data is loaded into the user’s browser. This means that once the page loads, and the getData() promise is resolved, our website will not request data again from our Google Sheet API. All our filtering will occur on the client-side, which is to say in the browser and not in our Google Sheet database. This organization helps us achieve the Functional Requirements we established in Episode 2.1 and has a few benefits:
- After
getData()loads the data, filtering data is almost instantaneous, because we do not need to keep requesting new data from the Google Sheets API. - As laid out in the Functional Requirements at the start of this episode, we want free database and web hosting solutions. Limiting our API requests ensures that we can continue with Google Sheets as our simple database.
- Security: We want a simple web solution, and a single get request from the API excludes any two way communication with our server, such as Post requests or the ability of users to inject malicious code back into our database. Our system is very simple, and this simplicity is its strength.
Let’s take a look at our search bar in our
index.html:
INDEX.HTML
<div class="search-bar">
<input id="input" autocomplete="off" type="text" aria-label="Enter keywords to search">
<button id="search-btn" aria-label="Run search button">Search</button>
<button id="refresh-btn" title="Refresh" aria-label="Refresh search results button">Refresh</button>
</div>In html, search bars are created using <input>
elements. Ours additionally has the id of “input.” We also have a search
button, this is the first <button> element with an id
of “search-btn.” We need to capture these two elements in our
app.js file in order to process a user’s search.
Switching to app.js, let’s target these two html
elements:
APP.JS
// Define API endpoint and DOM elements
const googleSheet = '<your Google Sheet API here>';
const display = document.getElementById('display');
const input = document.getElementById('input');
const searchBtn = document.getElementById('search-btn');The first goal is to capture a user’s keywords in the search bar.
- Let’s create a function called
runSearch()that will process a user’s keywords.searchTermswill get us the value inside the<input>html element as well as trim off any incidental white space at the beginning or end of the user’s keywords. For now, we willconsole.logthe user’s keywords.
APP.JS
// Filter data
function runSearch() {
const searchTerms = input.value.trim();
console.log(searchTerms)
}- Now we need to create an event listener that will trigger the runSearch(). An event listener in JavaScript is a function that is triggered when a user interacts with an HTML element. In our case, we want to trigger runSearch() when the user hits the return key or clicks the search button.
APP.JS
// Event listeners for search bar
// When the user clicks the search button
searchBtn.addEventListener('click', runSearch);
// When the user presses the return key in the search window
input.addEventListener('keypress', (event) => {
if (event.key === 'Enter') {
runSearch();
}
});In this video you can see that when there is text in the search bar
and the user either hits the return key or presses the search button,
our runSearch() function is activated and in turn logs the
text in the console.
Now we can create our filterData() function. First,
create a function called filterData() and have it accept as
an argument the user’s query. We capture this query in the
runSearch() function. We want to first have some logic
here. We want to check whether or not a user even has a keyword in the
search bar. Maybe they hit the search button without entering any
keywords.
APP.JS
function filterData(query) {
if (query) {
// Our filter function will go here
} else {
displayData(apiData);
}
};In this case, if the user does provide a query, our function will do something with that query to filter our data. If the user does not provide a query, our function does nothing and passes along the full dataset from our API to our displayData() function.
Normalization
We need to consider the variety of ways our users might search for material:
- Capitalization: Some users may capitalize words differently. They might use CAPSLOCK or all lowercase or Title Case Their Searches. Our filter function needs to be ready to handle all of these cases.
- Word Order: We want to search each keyword as if it were a unique search term as opposed to searching with one long string. For example, if we search as one string, and a user searches “art in mexico” or “mexico art,” the filter function will only return results that also have the words in the same order. What the user wants is all resources that mention art and mexico.
- Diacritics: Diacritics are the accent marks used in Spanish. Given that we are looking at a bilingual database and expect Spanish speaking users, we need to manage diacritics. It is best to make our filtering diacritic agnostic. For example, someone could misspell Pueblos indígenas as Pueblos indigenas.
The process to manage all the variety of ways users might enter search terms is called normalization. We will normalize all search input to prevent our filter function from excluding results because of capitalized letters, word order, or missing diacritics.
JavaScript makes normalizing for capitalization and word order easy.
Let’s return to our filterData() function, and add this
code if a user supplies a query:
APP.JS
function filterData(query) {
if (query) {
const searchTerms = query.toLowerCase().split(/\s+/)
} else {
displayData(apiData);
}
};We created a new variable called searchTerms. Inside
this variable, we first apply the .toLowerCase() method
which makes the user’s input keywords in lowercase and should eliminate
any problems around mismatched capitalization. Then we use the
.split() method to split up the user’s input on each space
(/+/) which is a regular expression that identifies spaces and creates a
new search term on the space. In the end, searchTerms will be an array
of search terms that we will use to filter our data.
Diacritics require an additional step: we must create our own function that will strip the diacritics from the user’s keywords:
APP.JS
function removeDiacritics(str) {
return str.normalize("NFD").replace(/[\u0300-\u036f]/g, "");
};This function takes a string (the user’s input) and applies
.normalize("NFD"). This command normalizes the input string
using the “Normalization Form D” (NFD) algorithm, which separates base
characters and diacritic markings. For example, “é” becomes “e” and ‘.
Then the .replace() method replaces all diacritic marks
with an empty string. The g flag ensures that all markings within the
string are replaced.
Now let’s add this removeDiacritics function and finish
normalizing the user’s input:
Apply .map()
The .map() function is very useful in JavaScript: it
creates a new array by applying a function to each element of the
original array. That’s important because remember that searchTerms is
actually an array of every term, separated by spaces, from the user’s
input. We use the arrow function, which takes each term in the array and
applies the removeDiacritics function on that argument.
Now that we’ve normalized the user’s search terms, we can use it to
filter the data. We will use the JavaScript filter()
function to return only those results in our data that match the user’s
search keywords:
APP.JS
// Filter data
function filterData(query) {
if (query) {
const searchTerms = query.toLowerCase().split(/\s+/).map(term => removeDiacritics(term));
const filteredData = apiData.filter(allData => {
return searchTerms.every(term => {
return (
Object.values(allData).some(value => {
if (value && typeof value === 'string') {
return removeDiacritics(value.toLowerCase()).includes(term);
}
return false;
})
);
});
});
displayData(filteredData);
} else {
displayData(apiData);
}
};
});
});
displayData(filteredData);
} else {
displayData(apiData);
}
}filter(), every(), & some()
We use three important methods to conduct the search: filter(), every(), and some().
- Filter() We use to iterate over every object in our API data to determine if it matches with the user’s search keywords.
-
Every() Iterates over each search term in the
searchTerms array. If all search terms match, the
every()method returns true, indicating that the object should be included in the filtered results. -
Some() Here is where the real matching occurs. It
is iterating over all the values for each object in the array. We can
think of each object in the array of API data as one resource in our
dataset. The values of the object are those we have in our dataset per
resource. For example, Resource_Title, Materias_en_Espanol, Languages,
and Summary. The
Some()function will take each search term and see if it matches within the values of an object and returns a boolean true or false. All search terms be true meaning that a resource must contain all the search terms in order for it to be included in the filteredData object. Within this some function, we include a bit of logic and processing on the API data. We first check that the data is a string, this way we can match the string of the user’s input to the string in the data. If it is a string, we apply the same normalization of capitalization and diacritics we applied to the keywords to the data. This way we remove any possibility for a missed match due to differences in capitalization or diacritic placement. In other words, we compare lowercase, diacritic-free search terms with lowercase, diacritic-free data.
Displaying Filtered Data
In the end, we pass our filteredData array to our
displayData() function to display the search results to our
user.
Now we are ready to test it. We need to make a small change to our runSearch() function, which at this time is logging our searchTerms to the console. We want to now pass the user’s supplied keywords to our new filterData() function like this:
Refresh Button
The last feature we need to add is a refresh button. This button will show all our resources without forcing the user to refresh the page.
Let’s identify the refresh button in app.js:
This button will clear all user keywords so they see all resources
with no filtering. We will do this by running the
runSearch() function with no user keywords.
Episode Summary
Establishing Functional Requirements: We learned how to define clear goals for a technical project, identifying optimal, free, and open-source solutions like Google Sheets, GitHub Pages, and Vanilla JavaScript for building a robust search and discovery system.
Transforming Google Sheets into a Database: We successfully converted a Google Sheet into a dynamic JSON-based API endpoint using Google App Script, enabling our website to retrieve and utilize the data.
Connecting Website and Database: We developed the
JavaScript getData() function to fetch JSON data from our
Google Sheet API and the displayData() function to present
this information effectively on the webpage.
Implementing Data Filtering and Search: We built robust client-side filtering capabilities, including normalization for capitalization and diacritics, allowing users to search the displayed data efficiently.
Content from Translation
Last updated on 2025-07-21 | Edit this page
Overview
Questions
- Why might a custom JavaScript translation be preferred over third-party translation tools for web content?
Objectives
- Implement a client-side JavaScript translation solution that displays specific content based on user language preferences.
Background
Translation remains an elusive problem on the web. Browsers permit the use of 3rd party tools like Google Translate to translate a web page on the fly. There are also subscription AI tools like Transifex. Translation has come a long way and it now enables users to access content from a variety of languages. But language is complicated by regionalisms, varieties, and problems between literal and figurative speech. At times, translation services miss these subtleties. JavaScript enables us a straightforward way to customize our translation for users and be sure that we have full control over the content that a user sees.
In this episode we will focus on setting up our language translation buttons in the top right corner of our page:
User Interface
First, we’ll create a new file called translation.js in
which we’ll create our translation app. Your file structure should look
like this:
–webapp
–app.js
–index.html
–style.css
–translation.jsNext, we need to link this new JavaScript file with our webpage. Open
up index.html and add a link using a
<script> tag at the bottom of the file:
INDEX.HTML
[...]
   <main>
       <div id="display"></div>
   </main>
<script src="translation.js"></script>
<script src="app.js"></script>
</body>
</html>Within our index.html file, we should also examine the
structure of the language selector:
INDEX.HTML
[...]
<div class="translation">
<a href="" data-lang="en">English</a>
<a href="" data-lang="es">Español</a>
</div>We see that these are actually anchor elements
<a>. We have left the href empty because these links
will not direct users to a new page. Instead, these links will trigger
our translation.js script. Also, we custom
data-lang elements. Notice that each link has a
two-character language code: en for English and es for
Spanish. We’ll use these to cue our translation.js script
to translate the page to the user’s language preference.
Next, lets take a look at the HTML elements we want to translate:
INDEX.HTML
[...]
<h1 id="welcome-msg">Explore the Collection</h1>
<div class="search-bar">
               <input id="input" autocomplete="off" type="text" aria-label="Enter keywords to search">
               <button id="search-btn" aria-label="Run search button">Search</button>
               <button id="refresh-btn" title="Refresh" aria-label="Refresh search results button">Refresh</button>
</div>We have our welcome message in the <h1>, search
button, and refresh button. All of these elements have an id element
that will let us target and translate them in
translation.js.
Storing our Translations
Now let’s switch over to translation.js. We will first
target all three of these elements:
TRANSLATION.JS
const welcomeMsg = document.getElementById('welcome-msg');
const searchButton = document.getElementById('search-btn');
const refreshButton = document.getElementById('refresh-btn');
Translation using JavaScript works by creating a 1:1 translation
table. When our script receives the language code, en or
es, it then looks up what text to display for the welcome
message, search button, and refresh button elements we just targeted
above. We’ll create an object called translations that
includes a set of content for English (en) and Spanish (es).
TRANSLATION.JS
const translations = {
   en: {
       welcomeMsg: 'Explore the collection',
       searchBtn: 'Search',
       refreshBtn: 'Refresh',
   },
   es: {
       welcomeMsg: 'Explorar la colección',
       searchBtn: 'Buscar',
       refreshBtn: 'Recargar',
   }
};
As you can see, we reference the element we want to target, for
example welcomeMSG. And then under each language, we put
the content we want to display.
translatePage() Function
Now we can create a function to execute our translation:
TRANSLATION.JS
let currentLanguage = 'en'; // Default language

function translatePage(language) {
   currentLanguage = language;

   // Update text content for the specified language
   welcomeMsg.textContent = translations[language].welcomeMsg;
   searchButton.textContent = translations[language].searchBtn;
   refreshButton.textContent = translations[language].refreshBtn;
}

// Initial translation based on the default language
translatePage(currentLanguage);
We start by setting our default language to English (en). Then we
create the function translatePage(), which takes as an
argument the two-character language code. For each element on our page,
JavaScript manipulates the textContent in the HTML by looking up our
specified translations. The script then injects the translated content
into our HTML.
Finally, we need to create an event listener that will pass the
two-character language code to our translatePage() function
when a user clicks on their preferred language:
TRANSLATION.JS
// Handle language selection from translation language links
document.querySelector('.translation').addEventListener('click', function (event) {
   const selectedLanguage = event.target.getAttribute('data-lang');
   if (selectedLanguage) {
       event.preventDefault(); // Prevent default page reload
       translatePage(selectedLanguage);
   }
});
When a user clicks on a language link, the script retrieves the
two-character code listed by the data-lang custom element.
event.preventDefault() will prevent the
<a> tag from carrying out its normal link action and
refreshing the page. If it refreshes the page, it will cause us to have
to reload the API data, which will make our site a much slower
experience for users. Finally, we pass the two-character language code
to translatePage() function.
Episode Summary
In this episode, we implemented a custom, client-side translation system by creating and linking a translation.js file. We did this by utilizing “data-lang” attributes and event listeners to capture a user’s language preference (“en” & “es”). Once a user makes a selection, our site’s content is dynamically translated with our predefined translation, giving us a free–and far more reliable–option than subscription or AI-based solutions.
Content from Host your Site on GitHub
Last updated on 2025-07-21 | Edit this page
Overview
Questions
- How can I freely host my web app online?
Objectives
- Create a GitHub account.
- Upload your web app files to a GitHub repository.
- Make your web app publicly accessible with GitHub pages.
Background
We’ve invested a lot of time and effort to building our web app. Now its time to deploy it to the internet! In this episode, we will use GitHub pages to freely host our web app files online and GitHub Pages to serve our site to the public at large.
What is GitHub?
GitHub is a platform where developers create, store, manage, and share their code. Its power lies in that it tracks every change you make to your code, essentially letting you “time travel” back to any previous version of your project. We call this time traveling “version control,” and it is made possible by Git, the underlying system that records every change you make to your files. Over time, GitHub has expanded its services and now offers one called GitHub Pages, which allows you to host websites directly from your GitHub account for free.
Create a GitHub Account
To begin, you’ll need to create a free GitHub account.
Go to github.com and click
Sign UpNext, enter your email then create a password and username. This username is very important as it is your unique identifier for your profile and projects, and a key for hosting your site through GitHub Pages.
Upload your Files to a Repository
Web projects tend to be composed of several files including HTML and
JavaScript documents as well as image, video, and text files. GitHub
stores all project files in a container called a repository. We call
respositories repo for short.
Before we can launch our site, we need to create a repo in which we will store all of our project files.
Create Your First Repo
Click on your User Profile, the circle in the top right corner of the screen.
Select
Your RepositoriesNow click the big green
Newbutton on the top of the page.

-
Next, you will be prompted to configure your repository:
Click
Create repositoryat the bottom of the page.
These steps above have guided you on how to create an empty repo. Now we will upload our web app files to the repo:
Next to the green
Codebutton, clickAdd filethen selectUpload files.Now drag and drop the HTML, CSS, and JavaScript files we’ve worked on in the previous episodes.
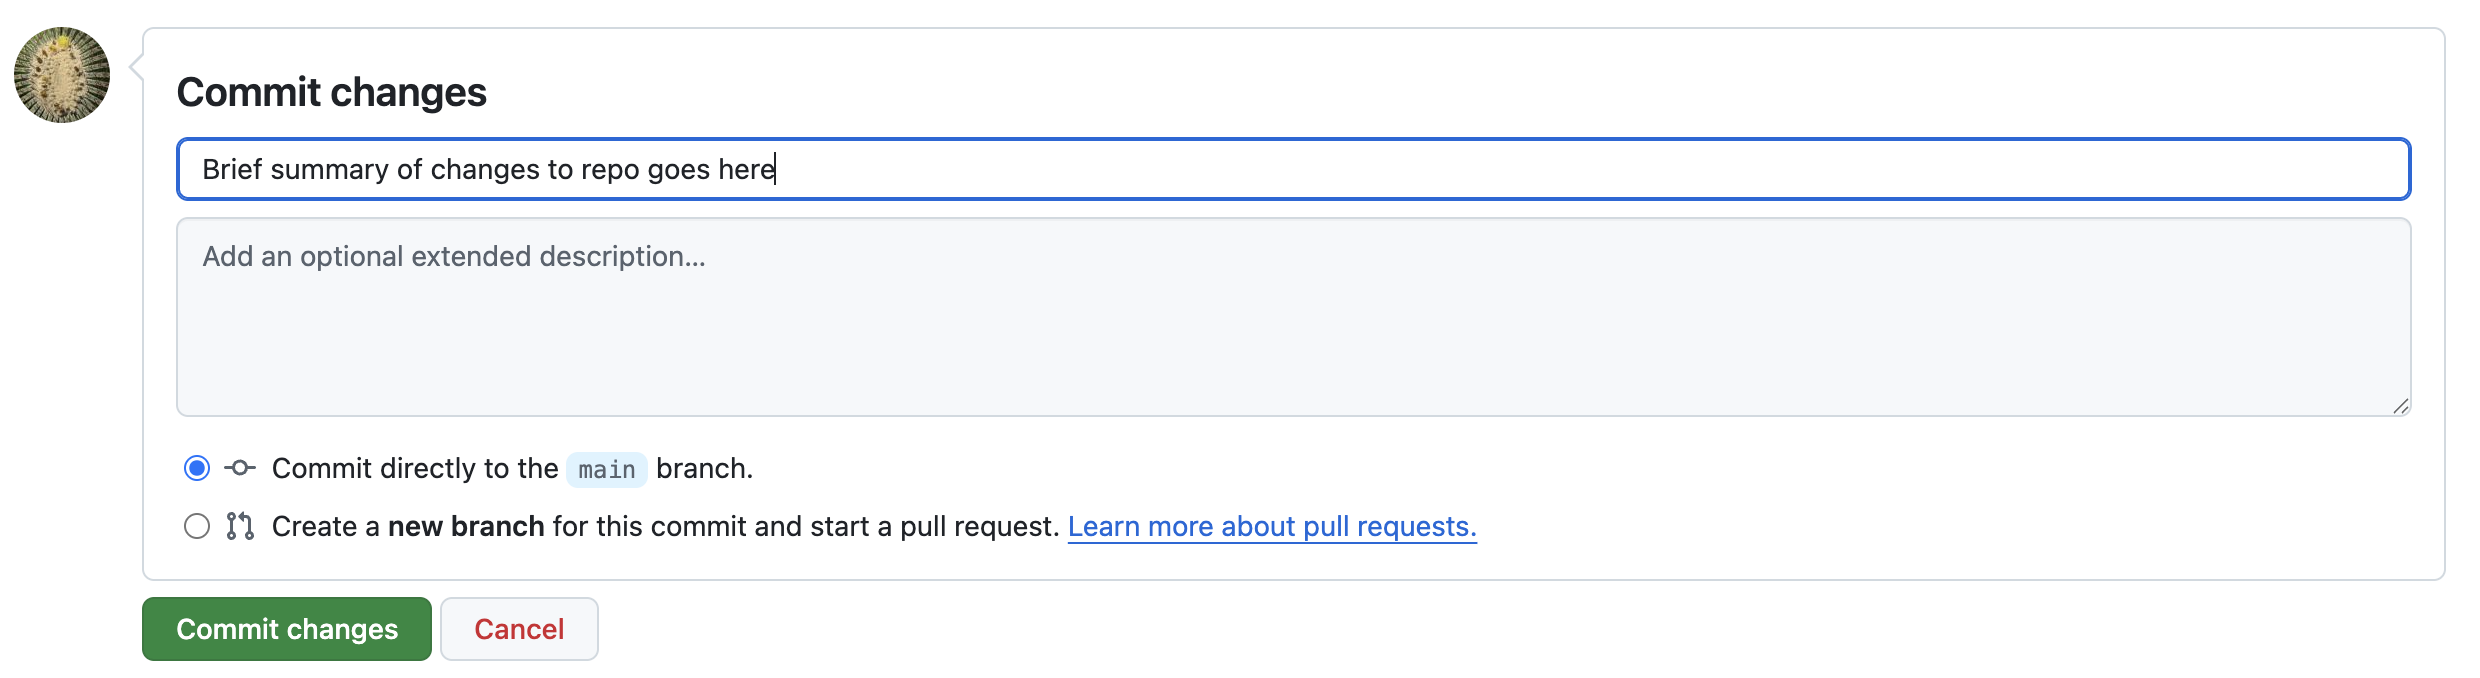
When we add files or make changes to files, Git (which manages GitHub’s version control system) calls this confirmation step a “commit.” In other words, we are committing to making these changes to the repo. It is customary to briefly summarize your changes when you commit them to the repo. You’ll do this in the first text field as seen in the screen shot below. Another custom is to write “First Commit” when you commit documents to a repo for the first time. These commit comments essentially label each change you make to your code. Go ahead and write “First Commit” in the top text field and click the green “Commit changes” button.
Congratualtions! You’ve just commited your first code to GitHub! All your hard work on the web app is now saved to the repo and you can share it with your friends and colleagues.
Deploy with GitHub Pages
GitHub Pages will use the documents in your repo to create a publicly accessible website for free.
- Click on the settings tab on the top navigation bar above your repo.

On the left side of the page, go to
Code and automationand clickPages.Under
Branchclick the drop down menu that is displayingNoneand selectmaininstead. Then clickSave.GitHub Pages will take a few moments to launch your site. Don’t navigate away from this page, wait for GitHub pages to generate the URL for your site. It will look like: https://[yourUserNameHere].github.io/webbapp
Now your webapp has a publicly accessible URL! Congratulations on deploying your web app! You can now share this URL with anyone to showcase your work.
Content from Promote Your Project and Prompt Participation and Collaboration
Last updated on 2025-09-21 | Edit this page
Overview
Questions
- What are the most effective strategies for promoting a project to a diverse and global audience?
- How do we foster multilingual and culturally diverse collaborations?
Objectives
- Identify and evaluate effective strategies to promote and increase visibility of your project among your diverse and global potential users.
- Learn how to encourage participation in your project and nurture collaborations that enhance its multilingual functionality, cultural diversity, and global usefulness.
- Develop an action plan to promote your project and encourage participation and collaboration.
Congratulations on developing a search and discovery system for data stored in a Google Sheet! This is an impressive achievement.
In this episode, we’ll explore how to develop an action plan. This plan will guide us in expanding our project’s reach and encouraging participation and collaboration. Let’s begin by exploring various strategies to increase the visibility of our project.
Think about how you can bring people in! How can you effectively promote your website to reach potential users who might find it valuable?
While not all of these possibilities may be directly applicable to your specific situation, it’s valuable to consider a wide range of options. The following ideas will help you identify the most effective ways to promote your project.
Expanding Your Project’s Reach
Encourage Others to Link to Your Project and Reuse Your Data
Allow reuse of your data by selecting a creative commons license appropriate to your work. Also, share your data with similar projects so that you can reuse their content and they can reuse yours.
-
Encourage librarians to link to your project in:
- E-resources/database finder platforms. Example: Library of Congress E-Resources Platform
- Library Guides. You can track those created using LibGuides, a content management and information sharing system, in this LibGuides Community website
Suggest other library projects or initiatives to include a metadata record for your project. Example: project LACLI in the Handbook of Latin American Studies and Resources for College Libraries (this database requires a subscription).
Disseminate Information via Organizations Listservs
Listservs could be from both library and subject related organizations. In the case of the project LACLI , we promote it in professional organizations such as the Seminar on the Acquisition of Latin American Library Materials (SALALM), sections of the Latin American Studies Association (LASA),the ACRL’s European Studies Section (ESS), and the National Association to Promote Library and Information Services to Latinos and the Spanish-Speaking (REFORMA). In addition to national and international organizations, consider promoting it in regional and local organizations as well.
Build an Effective Social Media Strategy
- Create social media profiles in those social media services you consider more effective for your intended audience. At the beginning of your social media strategy, you might need to explore a wider net of social media platforms and narrow them down based on their analytics.
For example, Linkedin might be a good option to target professionals across various industries and career stages interested in networking. X has been proven effective in targeting media professionals and political discourse. Also consider age groups. TikTok and Instagram are used more heavily by younger users over Facebook. Consider the potential of others such as Reddit, which is known for its diverse communities and discussions.
Follow organizations and people related to the subject of your project. Make sure you tag them when you create content related to something of their interest or that has been created by them. This is a low-maintenance way to start building connections with them by helping promote their own content or share with them related content connected to their interests. For example, in LACLI we create weekly posts featuring sources from our database. If we promote a source created by an organization, we tag it along with tags to potential individual users interested in it. This also expands the visibility of your posts to anyone that follows the account you are tagging.
Be strategic about the context, the nature of the content, and when you post it. For example, in LACLI we have featured content related to historical commemorations or celebrations. During the “back to school” period, we promote free curricular materials. Make sure you use hashtags to increase the visibility of your posts. Also, use at least one hashtag that can bring all the posts related to a specific theme or focus together. For example, for LACLI we use the hashtag #LACLIresources to bring all the resources that we feature together. In terms of content, explore various tones depending on your audience, but keep them short and to the point.
When crafting your posts, carefully consider two key language aspects:
Choice of language: Decide whether to write in English, Spanish, or other languages based on your target audience.
Writing style: Adapt your tone and vocabulary to suit your specific readers, whether they’re academics, high school teachers, or other groups.
Promote your project by using hashtags such as #DataScience or #TidyTuesday so others can contribute content to your project or reuse it to create other digital objects such as visualizations.
Be aware of the limitations of social media. When you rely solely on social media platforms, you’re not necessarily casting the widest possible net for your audience. While some individuals engage deeply with content and actively participate in discussions, many others interact differently. Furthermore, numerous individuals confine their social media use strictly to personal matters, avoiding professional or project-related content entirely. A significant portion of users tend to passively consume content. This passive consumption can limit the meaningful interactions and collaborations you might be hoping to achieve for your project.
Use Analytics and AI Tools
Use Analytics Tools to figure out aspects such as:
Type of content with more views and reactions
Visitor metrics
Best day and time to post your content
Google Analytics is the tool we use to monitor how people interact with the LACLI website. This tool provides various metrics, but we find the information about users’ geographical locations especially valuable. This data helps us tailor our outreach strategies more effectively. Also take advantage of the built-in analytics tools offered by various social media platforms.
You can also use AI tools to undertake additional types of analysis. For example, if you want to compare your project to similar projects, you could use this prompt: Compare [name of your project] to other similar online repositories specialized in [specify your subject(s)] Always ask follow-up questions when using AI tools. This helps you get more accurate and relevant answers.
Apply for Awards and Grants
Apply for awards and grants that could bring both recognition and financial support.
For this type of content, you’ll find several specialized databases that can be particularly helpful:
-
Subscription-based (it might include some partial access under some circumstances):
-
Free access:
Consider applying to awards and grants by organizations that support digital projects such as:
International organizations such as the Global Sustainability Coalition for Open Science Services (Scoss), a network of organizations committed to helping secure OA and OS infrastructure. It provides funding for open infrastructure
-
National organizations. The ones below are US-based. Think of any available in the country where you develop your project.
National Endowment for the Humanities (NEH). The NEH Office of Digital Humanities offers several grant programs specifically for digital projects. These grants support various stages of digital projects, from early development to implementation and evaluation.
American Council of Learned Societies (ACLS). Digital Extension Grants
Professional organizations In the case of LACLI, it received awards for best public project by LASA’s Archives, Libraries, and Digital Scholarship section and the SALALM Award for Institutional Collaborative Initiatives. Beyond prestige, these awards bring visibility to your project in specific communities interested in your content. It can also encourage others to explore collaborations. In the case of the SALALM, this award recognizes international collaborations. In addition to professional organizations at the national level, please also consider those at the international level (e.g. the Alliance of Digital Humanities Organizations (ADHO)), regional and local level.
Beyond organization-specific awards, there are independent recognition programs for digital humanities and scholarship projects, such as the Digital Humanities Awards. While these may not offer financial support, they can significantly boost your project’s visibility and recognition in the field.
Encourage Participation & Collaboration
Let’s proceed to our second objective: to explore strategies that can increase user engagement with a project. This can also lead to partnerships that improve your web-based tool’s ability to support multiple languages and its overall global usefulness.
Organize an Edit-a-thon
What is an Edit-a-thon?
An edit-a-thon is a collaborative event where people come together to create, update or improve content on a specific project. For example, there is a long tradition of edit-a-thons to contribute content to Wikipedia. These events usually have a specific focus, such as adding content related to a certain subject area, addressing content gaps, or focusing on underrepresented topics, cultures, or perspectives. Edit-a-thons are typically organized for a set period and include a training component, making them suitable for both experienced editors and newcomers. While traditionally held as in-person events, edit-a-thons can also be conducted virtually, allowing for wider participation.
Community building is an important aspect of these events. They serve as networking venues for people with similar interests and help build a sense of community among participants. This can translate into future collaborative partnerships. Edit-a-thons have become popular tools for institutions, organizations, and communities to engage people in content creation and improvement while promoting digital literacy and collaborative knowledge sharing. Ultimately, edit-a-thons can be a perfect venue to increase multilingual content and global reach by organizing edit-a-thons that can focus on a specific language, country etc. The underlying concept is that your project’s quality and effectiveness will significantly improve through diverse contributions from individuals representing various cultural backgrounds, linguistic groups, and nationalities. This approach will ensure that the content included in your project is respectful of different values and perspectives. We learn together, we contribute together. Nobody holds the whole knowledge on one topic. This diversity of perspectives and experiences enhances the project’s overall scope, relevance, and applicability across different contexts. Global collaboration enables projects to become more comprehensive, inclusive, and diverse by incorporating knowledge and perspectives from people worldwide.
Participate in Academic/Professional Events
When presenting your work, tailor your approach to each venue’s unique opportunities. At a conference presentation, your goal might be broad visibility for your project. In contrast, a roundtable could be ideal for in-depth discussions on specific initiatives or for sharing user experiences. By matching your expectations to the event type, you’ll maximize the impact of your event and make the most of each opportunity to showcase your work. Events that target a highly specific community can also be very effective. For example, if you want to promote your content among scholars in Latin American film, a good place to start would be the LASA’s Film Studies section. This event could also turn into a edit-a-thon in the future.
Apply Research Methods to Meet Your Specific Goals
Focus groups are a pertinent qualitative research method that involves gathering a small group of carefully selected participants to engage in an open discussion about a specific topic, project, or idea. Another useful one could be surveys that would allow you to collect data, analyze, and interpret data. Think creatively about surveys. For example, you could design a survey that asks participants to identify which resources they consider most essential to your project. Sharing the survey results could promote your content and help potential users discover the gems included in your collection.
Explore Collaborations to Provide a Global Dimension to Your Project
Beyond the usual networking opportunities (conferences, online platforms, etc.), look for relevant international research grants that require cross-country collaborations. This type of initiative offers an exceptional opportunity to build meaningful connections. Our experience with the LACLI project serves as an example of this strategy’s success. We took the initiative to reach out to two prestigious institutions: Colegio de México and Fundação Getulio Vargas. Our efforts paid off when we were awarded a grant aimed at enhancing the multilingual content of our project. The grant, initially seen as a means to an end, transformed into a long-term collaboration. It provided us with a structured environment, understanding each other’s working styles, learning the intricacies of effective international cooperation, and identifying areas where our combined expertise (language, cultural knowledge etc.) could bring solutions to any initiative related to our project. This experience laid a solid foundation for our partnership and opened doors to possibilities for future joint ventures.
Don’t limit yourself to long-term partnerships. Be open to seeking help for specific challenges as they arise. When faced with a technical problem you can’t solve, don’t hesitate to reach out to experts or organizations with the right knowledge. This targeted approach can quickly provide you with the solutions you need. For example, LACLI found an efficient solution for multilingual subject access by collaborating with the Hispanic American Periodicals Index (HAPI). Instead of creating our own controlled vocabulary from scratch, LACLI adopted HAPI’s existing thesaurus, which includes terms in English, Spanish, and Portuguese. This partnership not only saved time and resources but also ensured consistency in terminology across platforms. HAPI regularly shares updates to their vocabulary, and both organizations maintain open communication to address any term-related issues. While LACLI occasionally added new terms to meet specific needs, this collaboration significantly streamlined our ability to provide multilingual access to content without duplicating efforts.
In the spirit of avoiding redundant work, seek out opportunities to collaborate with similar projects to share metadata. Additionally, think about using a Creative Commons license for your project. Such a license can make it easier and more straightforward for others to use and build upon your work, fostering a culture of open collaboration and shared resources.
Design Experiential Learning Opportunities
Experiential learning offers numerous advantages for students and creators of projects. This hands-on approach to education provides an engaging learning environment that goes beyond traditional classroom instruction. Students develop a wide range of skills that are valuable in both academic and professional settings. By engaging in real-world challenges, students learn to approach problems creatively and think outside the box. If you develop one of these opportunities, make sure you clearly articulate the following in your position announcement: your learning objectives, skills required, benefits, outcomes, and mentorship provided.
Activity - Authentic Assessment
Apply what you have learned so far in this episode! Now it is your turn to come up with your own plan. Develop an action plan that:
- Identifies and evaluates effective strategies to promote and increase visibility of your project among your diverse and global potential users.
- Encourages participation in your project and nurture collaborations that enhance the multilingual functionality, cultural diversity, and global usefulness of your project.
Note: Use the two checklists below to guide your thinking process as you design your action plan.
Episode Summary
Promoting Your Project: We explored effective strategies to promote and increase visibility of your project among your diverse and global potential users.
Encouraging Participation and Collaboration: We learned how to encourage participation in your project and nurture collaborations that enhance its multilingual functionality, cultural diversity, and global usefulness.
Designing an Action Plan: We applied what you have learned in this episode by developing an action plan to promote your project and encourage participation and collaboration.