GPG Signature
This documentation is to help you be able to have signed commits when pushing to a repository. Signed commits allow others know that the commit comes from a reputable source.
Table of contents
MacOS
This will go through the steps starting from base system operations. If you already have some of these tools you can reference the offical documentation.
-
Check if you have homebrew installed
You can do so by running the following command
brew helpin your terminal. If you get a command not found then you don’t have it installed. To install homebrew run the following command in your terminal:/bin/bash -c "$(curl -fsSL https://raw.githubusercontent.com/Homebrew/install/HEAD/install.sh)" -
Check if you have GPG installed
To check if you have gpg installed run the following command
gpg --helpin your terminal. If you get a command not found then you don’t have it installed. To install gpg run the following command in your terminal:brew install gnupg -
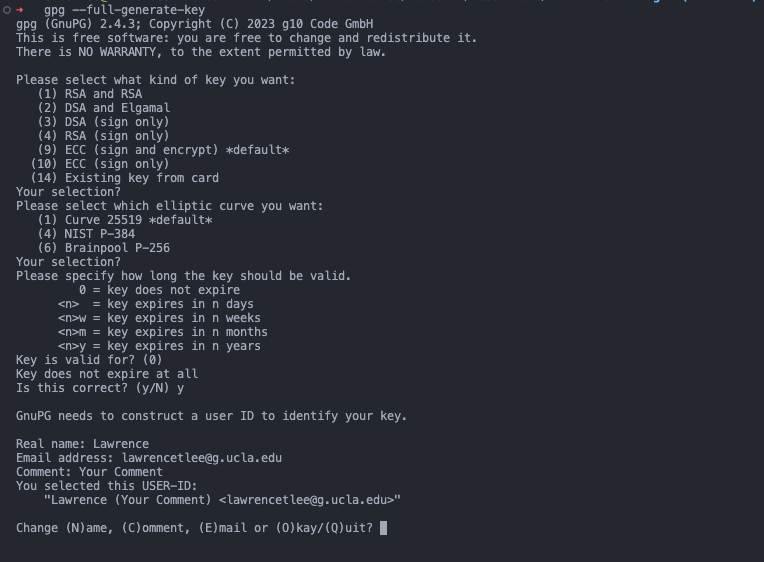
Generate a GPG key
To generate a GPG key you will run the following command:
gpg --full-generate-keyYou will get several options from here, just press
enterand fill in the portions you need to fill in. At the end type inOand hitenter. Now you have generated your gpg key.NOTE that the email you use must be the email attached to your github account
-
Extract your GPG key
To extract your gpg key run this command:
gpg --list-secret-keys --keyid-format=longYou should get an output that looks like this:$ gpg --list-secret-keys --keyid-format=long /Users/hubot/.gnupg/secring.gpg ------------------------------------ sec 4096R/3AA5C34371567BD2 2016-03-10 [expires: 2017-03-10] uid Hubot <hubot@example.com> ssb 4096R/4BB6D45482678BE3 2016-03-10Now look at the
secportion and extract the string after the/.Then run the following command:
gpg --armor --export <your_key>. If you follow the example it will look like:gpg --armor --export 3AA5C34371567BD2.That command should output your gpg key. Copy that key.
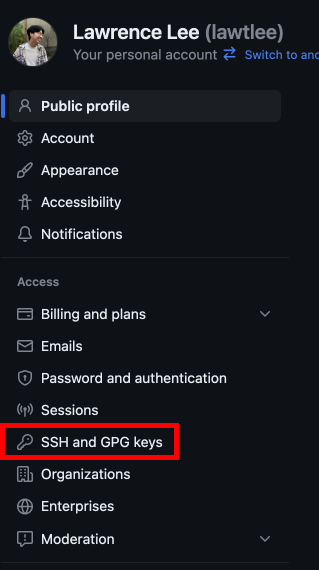
- Add your gpg key to your Github Account
-
Navigate to github
-
Go to your profile settings.

-
Go to SSH and GPG keys
-
Click
New GPG Key
-
Add a title and copy over your GPG Key

6 Click Add GPG key
-
-
Configure your git config
We now need to configure your git config to be able to sign your commits.
-
Add your signing key
You need to add your signing key to your git config. First you need to retrieve your key again. Extract your gpg key again by running the command:
gpg --list-secret-keys --keyid-format=long
and extract the string after/from thesecportion of the output.After extracting it run the following command:
gpg --list-secret-keys --keyid-format=long <your_key> -
Make sure you sign commits by default
To sign your commits by default run the following command:
git config commit.gpgsign true
-
-
Adding it to your shell
By now you should technically be able to sign all of the commits you make. However if you run into any errors. run the following command:
echo 'export GPG_TTY=$(tty)' >> ~/.zshrcRestart your terminal to activate the changes and now you should be able to sign your commits!